Exchange Server 2010 made leaps and bounds in the
area of data redundancy over Exchange Server 2007. A Mailbox database
can now exist on multiple Mailbox servers. One Mailbox server holds the
active copy of the database and the other servers hold passive copies.
When a change is made to the active copy of the database, the change is
recorded in the transaction log. When the transaction log is filled up,
it is closed and the log is replicated to the passive copies of the
database. The passive copies replay this transaction log into their own
copy of the database in order to keep the passive copies of the database
up-to-date.
In Exchange Server 2010,
databases are global objects and exist at the organization level.
Therefore, each database has its own unique identity and it may be
mounted by any server. Databases can be moved freely between Mailbox
servers, even if the Mailbox server hosts additional databases or
additional roles, such as the Hub Transport role or the Client Access
role. Databases can be activated on another server in either an
administrator-activated controlled manner (called a switchover) or in a failure scenario (called a failover).
|
There have been many
discussions on using replicated copies of the database as your backup in
Exchange Server 2010. One of the main points is that Exchange Server
2010 allows your database to be as big as 2 TB! With such a large
database, conventional backup and restore methods may not be viable.
Although using replicated databases as your backup is definitely a
possibility, it's not for everybody, so make sure that you understand
the implications before determining whether you want to do it. And if
you do it, make sure that you have at least three copies of the database
replicated to other servers.
|
|
1. Configure Redundant Databases
A database can have up to 16
copies spread across any Exchange Server 2010 Mailbox server in the
domain, although only one copy is active.
To replicate a database
across multiple servers, those servers must be in the same DAG. The DAG
monitors the databases that its servers hold and contains the necessary
information to determine which passive copy should be used if the active
copy goes offline. The component called the Active Manager makes these
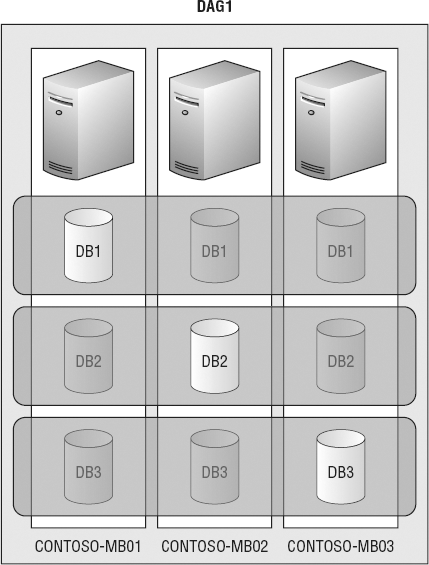
determinations. Figure 1
illustrates the concept of DAGs at a high level. Note that databases
can be spread across servers in a DAG in any manner that you see fit.
NOTE
Each server in a DAG can
hold up to 100 databases, whether they are active or passive. You can
have up to 16 servers in a DAG, which means that you could potentially
have 16 copies of a single database.
1.1. Create a Database Availability Group
A DAG consists of three primary components, all of which do not need to be explicitly defined when you create the DAG:
DAG name
IP address
Witness location
The DAG name and IP address are
used internally by Exchange. If you do not specify a static IP address,
the DAG will attempt to get an address through a Dynamic Host
Configuration Protocol (DHCP) server. The DAG name must follow the
standard rules of naming a computer and cannot exceed 15 characters.
When you specify the IP address of the cluster, be sure to include IP
addresses for each subnet if you have DAG nodes from different subnets.
NOTE
You can't start
using a DAG immediately after it's created. Even though you specified
the parameters for the DAG, the cluster isn't created until the first
node is added to the DAG. So before you can use the DAG, you must add
servers to it.
The witness location is where
the file share witness is stored. To ensure that a cluster has an
accurate understanding of which node is the active one, a quorum is
needed. Since DAGs could potentially contain an even number of Mailbox
servers and there is no shared disk resource as in traditional clusters,
there is the possibility that more than one node could think that it
should be active if there are network issues. Therefore, the witness
resource makes this arbitration when there is an even number of servers.
The witness resource is managed by Exchange and is added and removed
from the DAG as needed when the number of DAG servers changes. You can
specify the server that hosts the witness resource and the name of the
share, but Exchange manages the resource itself. There is no harm in
just letting Exchange handle this aspect unless you want to make a point
of placing the witness on a server that doesn't host the Hub Transport
role.
To create a DAG in the EMC:
Open the EMC and browse to the Organization Configuration => Mailbox node in the Console tree.
In
the Actions pane, click the New Database Availability Group option.
This will launch the New Database Availability Group wizard.
At the New Database Availability Group screen, type the name of the DAG into the Database Availability Group Name field.
Click the New button to create the DAG and let Exchange handle the witness configuration.
At the Completion screen, click Finish.
To create a DAG with the EMS, you can use the New-DatabaseAvailabilityGroup
cmdlet. The only thing that you are required to specify in the command
is the name of the DAG. The following command creates the DAG with the
default parameters:
New-DatabaseAvailabilityGroup -Name DAG01
If you want to specify the witness location, you can use the WitnessServer and WitnessDirectory
parameters. You may be required to manually set the witness location if
you don't have any Hub Transport servers without the Mailbox server
role installed.
If you want to specify the IP addresses used by the DAG, you can include the DatabaseAvailabilityGroupIPAddresses
parameter. For example, the following command creates a DAG that will
have nodes on the 10.0.1.0/24 subnet and the 192.168.1.0/24 subnet:
New-DatabaseAvailabilityGroup DAG02
-DatabaseAvailabilityGroupIPAddresses
10.0.1.100,192.168.1.100
1.2. Change the Witness Server
There may be cases where
you want to customize the witness server and witness directory for a
DAG. For example, if you want to place the witness on a server that
doesn't run Exchange or doesn't host the Hub Transport role, you will
need to specify the witness location yourself.
|
If you are moving the witness to a
server that does not have Exchange installed, you will need to add the
Universal group called Exchange Trusted Subsystem to the local
Administrators group on the server. This will ensure that the Exchange
servers have the appropriate permissions to the witness share.
|
|
To change the witness using the EMC, use the following steps:
Open the EMC and browse to the Organization Configuration => Mailbox node in the Console tree.
Click the Database Availability Group tab in the Work area. This will list the current DAGs that you have configured.
Select the DAG that you want to set the witness on and click the Properties option for the DAG in the Actions pane.
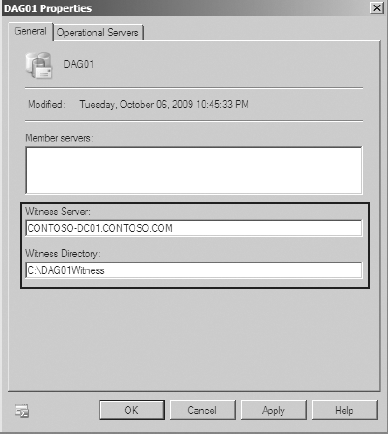
In
the General tab of the DAG's properties dialog box, modify the Witness
Server and Witness Directory fields to correspond to the server and
location where you want to place the DAG (see Figure 2). File sharing must be enabled on the server that you are moving the witness to.
Click OK to move the witness and close the properties dialog box.
If you prefer to move the witness using the EMS, you can use the Set-DatabaseAvailabilityGroup cmdlet with the WitnessServer and WitnessDirectory parameters. The WitnessServer parameter specifies the name of the server that the witness is moved to. The WitnessDirectory parameter specifies the location of the witness folder on the server. The following command illustrates the syntax:
Set-DatabaseAvailabilityGroup DAG01 -WitnessServer
contoso-dc01.contoso.com -WitnessDirectory C:\DAG01Witness
1.3. Add Servers to a DAG
After the DAG is created, you
will need to add servers to it before Mailbox databases can be
replicated. DAGs allow you to add Mailbox servers that hold additional
roles as well, which is an advantage over Exchange Server 2007. Each
Mailbox server that you add to a DAG must have two network cards with
properly configured IP addresses on different subnets, one for client
traffic and the other for cluster traffic.
To add a server to a DAG using the EMC, follow these steps:
Open the EMC and browse to the Organization Configuration => Mailbox node in the Console tree.
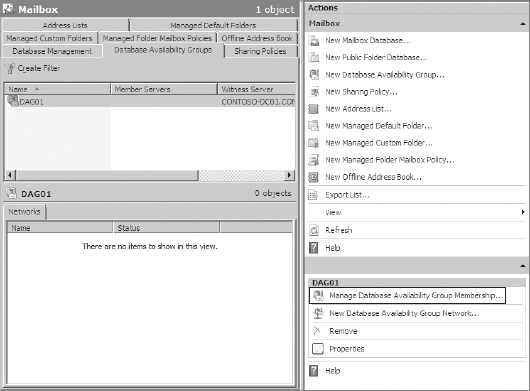
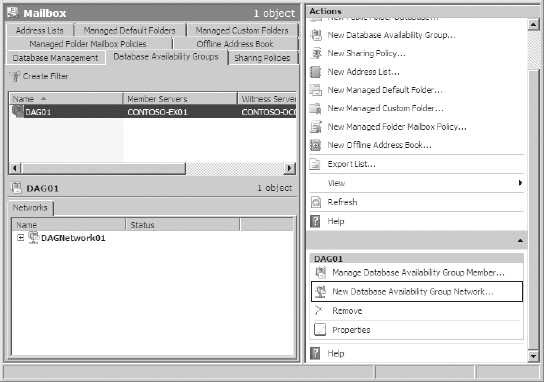
Click the Database Availability Group tab in the Work area. Select the DAG that you want to add a server to.
In the Action menu for the DAG, click the Manage Database Availability Group Membership option, as shown in Figure 3. This launches the Manage Database Availability Group Membership wizard.
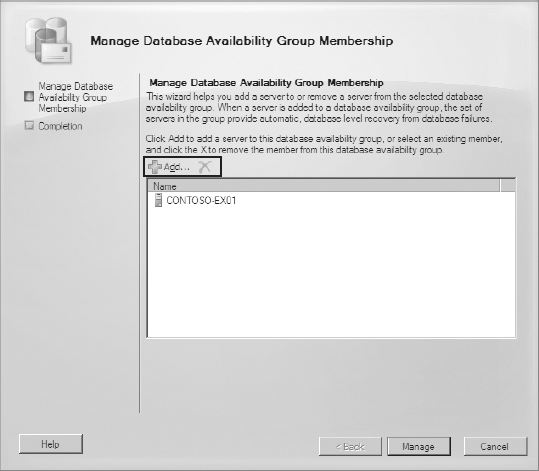
At the Manage Database Availability Group Membership screen, click the Add button to browse for a server to add to the DAG (see Figure 4).
After you add the server to the list, click the Manage button to add the server.
At the Completion screen, click the Finish button.
To add a server to a DAG using the EMS, you can run the Add-DatabaseAvailabilityGroupServer cmdlet. Specify the name of the DAG that you are adding the server to and specify the name of the server using the MailboxServer parameter. The following example adds a server to a DAG:
Add-DatabaseAvailabilityGroupServer DAG02 -MailboxServer
CONTOSO-MB02
1.4. Replicate Databases to Additional Servers
When you want to replicate a
database onto other Mailbox servers, those servers must be in the same
DAG as the database. In addition, the database and transaction log paths
for the database copy must be the same on each server. For example, if
the database and logs are in D:\DB01 on one server, then they must be in
D:\DB01 on all servers that have a copy of that database.
When you add a copy of the database to a server, the database must first be seeded,
that is, copied to the target server. If the database is large, seeding
can take a long time and you may not want to start it in the middle of
the day. Because of this, you have the option of postponing the seeding
process. You can also choose to seed from another passive copy of the
database.
Another option that you need to consider before adding a database replica is the activation preference number.
This number specifies the order in which passive databases are brought
online if more than one copy passes the activation criteria imposed by
Active Manager. For example, if there are three copies of the database
and the active copy fails, then two passive copies are available. If it
is determined by Active Manager that both copies are healthy and current
and that their transaction log queue lengths are small enough, the
database copy with the lowest activation preference number is activated.
You can modify the activation
preference number after a database copy is added to a server in the DAG.
Use the following steps in the EMC after you have added the server to
the DAG:
Open the EMC and browse to the Organization Configuration => Mailbox node in the Console tree.
Click
the Database Management tab in the Work area. Select the database that
you want to modify the activation preference number on from the list of
available databases.
In
the bottom half of the Work area, the list of database copies will be
populated for the database that you selected. Select the copy for the
server that you want to modify the activation preference number for and
choose Properties from the Action menu. Make sure that you select the
Properties option for the database copy and not the database itself.
In the properties dialog box for the database copy, click the General tab.
Modify the Activation Preference Number to make this database copy activate in the order that you choose.
Click OK to close the properties dialog box and commit the changes.
You can also modify the Active Preference Number using the Set-MailboxDatabaseCopy cmdlet with the ActivationPreference parameter, as shown here:
Set-MailboxDatabaseCopy "DB01\CONTOSO-MB01"
-ActivationPreference 2
You can add a database replica inside a DAG with the EMC using these steps:
Open the EMC and browse to the Organization Configuration => Mailbox node in the Console tree.
Click
the Database Management tab in the Work area. Select the database that
you want to replicate from the list of available databases.
In the Action menu for the database you selected, click the Add Mailbox Database Copy option, as shown in Figure 5. This launches the Add Mailbox Database Copy wizard.
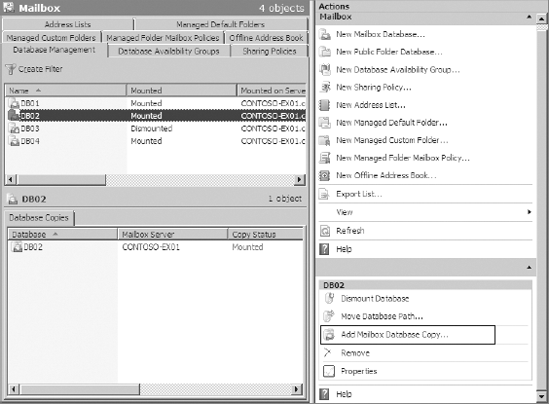
At
the Add Mailbox Database Copy screen, click the Browse button to select
a server that you want to add the database copy to. This server needs
to be in the same DAG as the server that already has the active copy of
the database.
Click the Add button to add the database copy to the server that you selected.
At the Completion screen, click the Finish button.
You can also add a database replica using the EMS. To do so, use the Add-MailboxDatabaseCopy cmdlet and specify the Mailbox server and activation preference using the parameters MailboxServer and ActivationPreference, respectively. You can also specify the SeedingPostponed
parameter to postpone the seeding of the database file. The following
example adds a database copy with an activation preference of 2:
Add-MailboxDatabaseCopy DB01 -MailboxServer CONTOSO-MB02
-ActivationPreference 2
1.5. Configure the Network Used by an Availability Group
DAGs can have multiple
networks assigned to them. When you assign a network to a DAG, you
associate subnets with it. Those subnets can be isolated for either
client traffic or replication traffic. By using a DAG network, you can
tune the type of traffic that is passed over the various IP addresses
for the servers that are members of the DAG.
1.5.1. Create a DAG Network
When you create a DAG network,
you must specify the subnet in the form of an IP address and bitmask.
For example, if you specify 192.168.0.0/24, the IP addresses 192.168.0.1–192.168.0.254
are included in that subnet. You can have multiple subnets in a single
DAG network. You can create a DAG network in the EMC using the following
steps:
Open the EMC and browse to the Organization Configuration => Mailbox node in the Console tree.
Select the Database Availability Groups tab in the Work area. The list of DAGs is presented.
Select
the DAG that you want to create the network for and choose the New
Database Availability Group Network option from the DAG's Action menu,
as shown in Figure 6.
In
the New Database Availability Group Network wizard, type a name for the
network in the Network Name field. Click the Add button to add a subnet
to the subnet list, as shown in Figure 7.
When you enter the subnet in the Add Subnet dialog box, you will need
to use the format of IP Address/Bitmask. For example, the 192.168.0.1–192.168.0.254 subnet would be represented with 192.168.0.0/24.

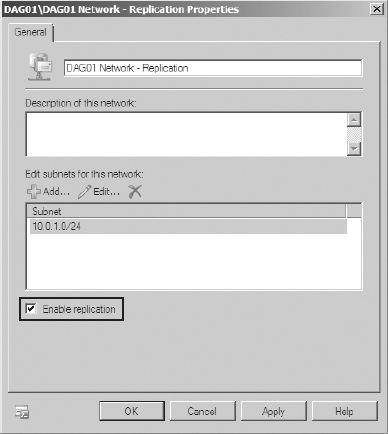
If
you want to use this network for only database replication traffic, you
can check the Enable Replication box. Click the New button to create
the DAG network.
At the Completion screen, click the Finish button.
|
During creation, if you
specify a subnet that is already assigned to another DAG network, that
subnet will be moved to the DAG network that you are creating.
|
|
You can also create the DAG network with the New-DatabaseAvailabilityGroupNetwork cmdlet in the EMS. When you run this cmdlet, you will need to specify the parameters in Table 1.
Table 1. EMS Parameters Used When Creating a DAG Network
| Parameter | Description |
|---|
| DatabaseAvailabilityGroup | The name of the DAG for which you are creating the DAG network. |
| Name | The name of the DAG network. |
| Subnets | The subnets in the network, using the IP Address/Bitmask format. |
| ReplicationEnabled | If set to $True, the network is only used for replication. If set to $False, the network is only used for client traffic. |
The following command creates a DAG network that is dedicated to replication:
New-DatabaseAvailabilityGroupNetwork
"DAG01 Network - Replication" -DatabaseAvailabilityGroup
DAG01-Subnets 192.168.0.0/24 -ReplicationEnabled:$True
1.5.2. Dedicate a DAG Network to Replication or MAPI Only
A DAG network can be enabled for
either MAPI client traffic or data replication. If you are disabling
replication on a DAG network, you should have at least one other DAG
network available for replication to take place on. If not, the server
will use the IP address that is published in DNS for database
replication.
To configure a DAG network for replication or MAPI access only, use the EMC to complete the following steps:
Open the EMC and browse to the Organization Configuration => Mailbox node in the Console tree.
Select
the Database Availability Groups tab in the Work area. Select the DAG
that contains the network you want to dedicate traffic to.
The
bottom half of the Work area will list the DAG networks that exist for
the DAG you selected. Click on the DAG network that you want to modify
and choose the Properties option from the network's Action menu.
In
the properties dialog box for the DAG network, check the option Enable
Replication to ensure that this network is used only for replication (Figure 8). If you want the network available for client traffic only, uncheck the box.
Click OK to make the changes and close the properties dialog box.
To configure the traffic type on the DAG network with the EMS, run the Set-DatabaseAvailabilityGroupNetwork cmdlet with the ReplicationEnabled parameter. Set the parameter to $True to enable replication only or set it to $False to enable MAPI traffic only.
When you reference the name of the DAG network, use the format DAGName\DAGNetworkName. For example, if the DAG network called DAG01Network is a part of the DAG named DAG01, you should use DAG01\DAG01Network in the command.
The following example sets the DAG network to MAPI client traffic only:
Set-DatabaseAvailabilityGroupNetwork
"DAG01\DAG01Network -MAPI" -ReplicationEnabled $False